Personal Projects
mikoshidb.net
A Cyberpunk Mikoshi themed terminal where users load engrams (AI character personas, encodes into system prompts in /src/engrams) onto biochip firmwares (quantised LLMs running entirely in-browser via WebLLM/WebGPU, available models set via src/firmware) and chat in-character.
Responses are grounded in Fandom wiki lore through opensona, a RAG toolkit that ships as part of this monorepo that builds the RAG bundle and provides the runtime API.
Character engrams have a temporal cut-off that's lore accurate to when their engram would be created.
Within the mikoshidb.net monorepo, opensona is consumed as a workspace package ("opensona": "workspace:*").
Dev Prerequisites
- Node.js >= 22
- pnpm >= 10
- A WebGPU-capable browser (Chrome 113+, Edge 113+, or Firefox Nightly)
- A beefy enough computer to build the graph RAG artifacts and run the WebLLM models.
Quick start
pnpm install
pnpm dev
Open the URL shown by Vite. The app will:
- Run a boot sequence and detect WebGPU support
- Prompt you to load a firmware (LLM) and jack into an engram (character)
- Stream in-character chat responses grounded in Cyberpunk wiki lore
RAG - Build
.opensona folder contains
- Configuration:
opensona.config.json,opensona.prebuild.json - Download Output (pnpm rag:download -> /downloads) Output (/downloads):
dump.xml - Prebuild Output (pnpm rag:prebuild -> /generated):
timeline.json - Build Output (pnpm rag:build -> /output -> pnpm rag:publish -> copies to public/rag):
aliases.json.gz,graph-edges.json.gz,graph-nodes.json.gz
RAG - Retrieval
User Message -> Rag Retrieval (best effort) -> Append to lore preamble before system prompt
This obeys the character perspective and their temporal cut-off.
Debug mode
Append ?debug=true to enable debug side bar.
Tech stack
- Vue 3 + TypeScript + Vite
- Tailwind CSS v4 for styling
- WebLLM (
@mlc-ai/web-llm) for in-browser LLM inference via WebGPU - opensona for RAG (hybrid BM25 + dense vector retrieval)
- pnpm workspaces for monorepo management
Self-hostable web app for watching movies & shows easily by searching for them on TMDB and watching them with VidSrc
VidSrc Wrapper - TMDB Movie Search
A TypeScript movie search application using The Movie Database (TMDB) API, which also happens hook into VidSrc.. and in theory any other legal streaming service that uses IMDB/TMDB ids.
This isn't hosted anywhere, but it's made in such a way to make it very simple to run on your own servers.
Stack: Full-stack Typescript, Vue 3 + Vite client, Hono server
Setup
Prerequisites: TMDB Read Access Token (Bearer auth) (get one here)
Install dependencies:
npm installCreate
.envfile in root:TMDB_API_KEY=your_tmdb_read_access_token_hereRun
npm run dev
This starts:
- Backend at
http://localhost:8080 - Frontend at
http://localhost:3000
LinkBlitzer
Making it simple to share and open bundles of links. Paste links into LinkBlitzer, get one shareable link. Recipients see all shared links and can open them individually, select multiple, or all at once.
Example use cases: sharing hotel listings with a friend, saving a list of research articles to your bookmarks to reopen them later, grouping together your team onboarding links, creating and saving reading lists, managing your tab routines.
Packages
This is an npm workspaces monorepo with three packages:
| Package | Description |
|---|---|
@linkblitzer/core | Encoding/decoding, validation, shared types |
@linkblitzer/website | Vue 3 SPA — create and view blitz links |
@linkblitzer/extension | Browser extension — opens links on behalf of the website (bypassing pop-up limitations) |
Core (packages/core)
Shared library consumed by the website and extension. Does nothing on its own.
What it provides:
encode(payload)— serializes an array of{ url, notes? }objects to URL-safe Base64decode(encoded)— deserializes and validates with Zod, returns{ ok: true, data }or{ ok: false, error }isValidUrl(url)/validateUrls(urls[])— URL validation via theURLconstructor- Zod schemas:
BlitzUrlSchema,BlitzPayloadSchema - Shared message types:
MessageOpen,MessageReady,LinkBlitzerMessage
Commands:
npm run build -w packages/core   # compile TypeScript
npm run test -w packages/core    # run Vitest tests
Or from the root:
npm run build:core
npm test
Website (packages/website)
Vue 3 + Vite SPA with two routes:
/— Create mode: enter URLs (with optional notes), validate them inline, generate a shareable blitz link/view?shared=...— View mode: decode the link, display URLs with favicons, select and open them
Blitz link format:
linkblitzer.com/view?shared={url-safe-base64-encoded-json}
The JSON is an array of { url, notes? } objects. Favicons are fetched at view time via Google's favicon service and are not encoded in the link.
Extension integration:
On mount, the view page listens for a LINKBLITZER:READY postMessage from the extension content script. If the extension is present, "Open selected" sends a LINKBLITZER:OPEN message and the extension handles opening the tabs. If the extension is absent, the page falls back to window.open() — which is blocked on most mobile browsers and some desktop ones when opening many tabs at once.
Dev:
npm run dev:website        # from root
# or
npm run dev -w packages/website
Runs Vite dev server, typically at http://localhost:5173.
Build:
npm run build:website
# or
npm run build -w packages/website
Deployment (GitHub Pages — TODO):
The website targets GitHub Pages at linkblitzer.com. Deployment scripts need to be added (e.g. gh-pages npm package or a GitHub Actions workflow that runs vite build and pushes dist/ to the gh-pages branch). The Vite config will likely need a base option set if hosted in a subdirectory.
Extension (packages/extension)
A minimal browser extension built with WXT. It runs as a content script on the LinkBlitzer website and localhost dev URLs.
What it does:
- On load, announces itself:
window.postMessage({ type: 'LINKBLITZER:READY' }, '*') - Listens for
{ type: 'LINKBLITZER:OPEN', urls: string[] }messages from the page - Validates
event.originagainst an allowlist (https://linkblitzer.com,http://localhost:3000,http://localhost:5173) - Opens each URL with
window.open(url, '_blank')
Dev (side-load in browser):
# Chrome
npm run dev:ext:chrome     # from root
# or: npm run dev:chrome -w packages/extension

# Firefox
npm run dev:ext:firefox
# or: npm run dev:firefox -w packages/extension

# Safari
npm run dev:ext:safari
# or: npm run dev:safari -w packages/extension
WXT will build the extension and open a browser with it loaded automatically (Chrome/Firefox). For Safari, it generates an Xcode project.
Build:
npm run build:ext             # Chrome (MV3)
npm run build:ext:firefox     # Firefox
npm run build:ext:safari      # Safari
Output is in packages/extension/.output/.
Side-loading (manual install without publishing):
- Chrome/Edge: Go to
chrome://extensions, enable "Developer mode", click "Load unpacked", and selectpackages/extension/.output/chrome-mv3/ - Firefox: Go to
about:debugging#/runtime/this-firefox, click "Load Temporary Add-on", and select any file insidepackages/extension/.output/firefox-mv3/ - Safari: Build the Safari target (
npm run build:ext:safari), open the generated Xcode project, and run it. Enable the extension in Safari's settings under Extensions
Publishing (TODO):
- Chrome Web Store: Create a developer account, zip the
chrome-mv3output, and submit via the Chrome Developer Dashboard. Review typically takes a few days. - Firefox Add-ons (AMO): Submit the
firefox-mv3zip at addons.mozilla.org. Firefox requires source code submission for review. - Safari Extensions: Distribute through the Mac App Store. Requires an Apple Developer account and app review. The WXT Safari output is an Xcode project that wraps the extension in a native app container.
- Edge Add-ons: The Chrome MV3 build can typically be submitted as-is to the Microsoft Edge Add-ons store.
Root commands
npm run dev:website           # website dev server
npm run dev:ext:chrome        # extension dev (Chrome)
npm run dev:ext:firefox       # extension dev (Firefox)
npm run dev:ext:safari        # extension dev (Safari)

npm run build:core            # build core
npm run build:website         # build website
npm run build:ext             # build extension (Chrome)
npm run build:ext:firefox     # build extension (Firefox)
npm run build:ext:safari      # build extension (Safari)

npm test                      # run core tests
npm run lint                  # ESLint
npm run format                # Prettier
Tech stack
- Vue 3 + TypeScript (Composition API,
<script setup>) - Vue Router
- Vite
- WXT (browser extension framework)
- Zod
- Vitest
- ESLint + Prettier
- npm workspaces
yaqinhasan.com
Personal portfolio website built with Vue 3 & TypeScript
Quick Start
Cloning & npm install
git clone https://github.com/yaq1n0/yaqinhasan.com.git
cd yaqinhasan.com
npm ci
Package.json scripts
# Build
npm run build

# Run dev server
npm run dev

# Testing
npm run test
npm run test:watch
npm run test:coverage

# Code quality
npm run lint
npm run lint:fix

# Formatting
npm run prettier
npm run prettier:fix
Feature breakdown
JSON -> Web CV
- Displays cv.json dynamically using Vue.
- Allows generation of cv.pdf using
render-pdf.ts. (requires playwright setup withnpm run setup:playwright)
Interactive "Terminal"
- Allows users to interact with the website via a "terminal" interface
- Allows power-users to configure things like dev-mode and themes
- Unix commands for navigating the site
- Is quite fun (supposedly)
Theme System
- Users can pick from various themes
- Themes come from
ThemeRegistry.ts - Themes have light and dark modes
- Theme preference is stored in localStorage
- Default theme light|dark mode detected from system prefers-dark
CI/CD
There is a barebones CI pipeline in ci.yaml which does
- Unit testing
- Validation of themes, including WCAG compliance
- Linting
- Formatting
The build process generates a dist/ folder with:
- Static HTML files for each route
- Optimized JavaScript and CSS bundles
- All public assets with proper paths
- 404.html for fallback handling
Currently deployed to Github Pages using deploy.yml
Links
- Live Site: yaqinhasan.com
- GitHub: github.com/yaq1n0/yaqinhasan.com
- LinkedIn: linkedin.com/in/yaqinhasan
pwordgen.com Frontend
A minimal, fast, client-side website that generates secure passwords using the pwordgen npm package.
Features
- Secure Password Generation: Uses cryptographically strong randomness via the
pwordgenpackage - Client-Side Only: No data is sent to any server - everything runs in your browser
- Customizable Options: Control length, character types, exclusions, and requirements
- Entropy Display: Shows password strength in bits
- URL Persistence: Options are saved in URL parameters for easy sharing
- Responsive Design: Works on desktop and mobile devices
- Accessible: Keyboard navigation and screen reader friendly
Development
Prerequisites
- Node.js 20+
- npm
Setup
npm install
Development Commands
# Start development server
npm run dev

# Run tests
npm run test

# Run tests in UI mode
npm run test:ui

# Type checking
npm run type-check

# Linting
npm run lint

# Code formatting
npm run prettier

# Build for production
npm run build

# Preview production build
npm run preview
Tech Stack
- Vue 3 - Progressive JavaScript framework
- TypeScript - Type safety and better developer experience
- Vite - Fast build tool and development server
- Vitest - Fast unit testing framework
- ESLint - Code linting
- Prettier - Code formatting
Testing
The project includes comprehensive tests covering:
- Component rendering
- User interactions
- Password generation
- Option persistence
- Error handling
- Copy functionality
Deployment
This project uses a two-stage GitHub Actions CI/CD pipeline:
1. CI Workflow (.github/workflows/ci.yml)
Runs on every push and pull request to main:
- Type checking with TypeScript
- Code linting with ESLint
- Code formatting check with Prettier
- Unit tests with Vitest
2. Publish Workflow (.github/workflows/publish.yml)
Runs automatically after CI completes successfully on main:
- Builds the production bundle
- Deploys to GitHub Pages
To deploy:
- Push changes to
mainbranch - CI workflow runs quality checks
- If CI passes, publish workflow automatically deploys to GitHub Pages
Security
- Uses Web Crypto API for secure random number generation
- No external dependencies for password generation
- No telemetry or analytics
- No network requests during password generation
- All processing happens client-side
License
MIT
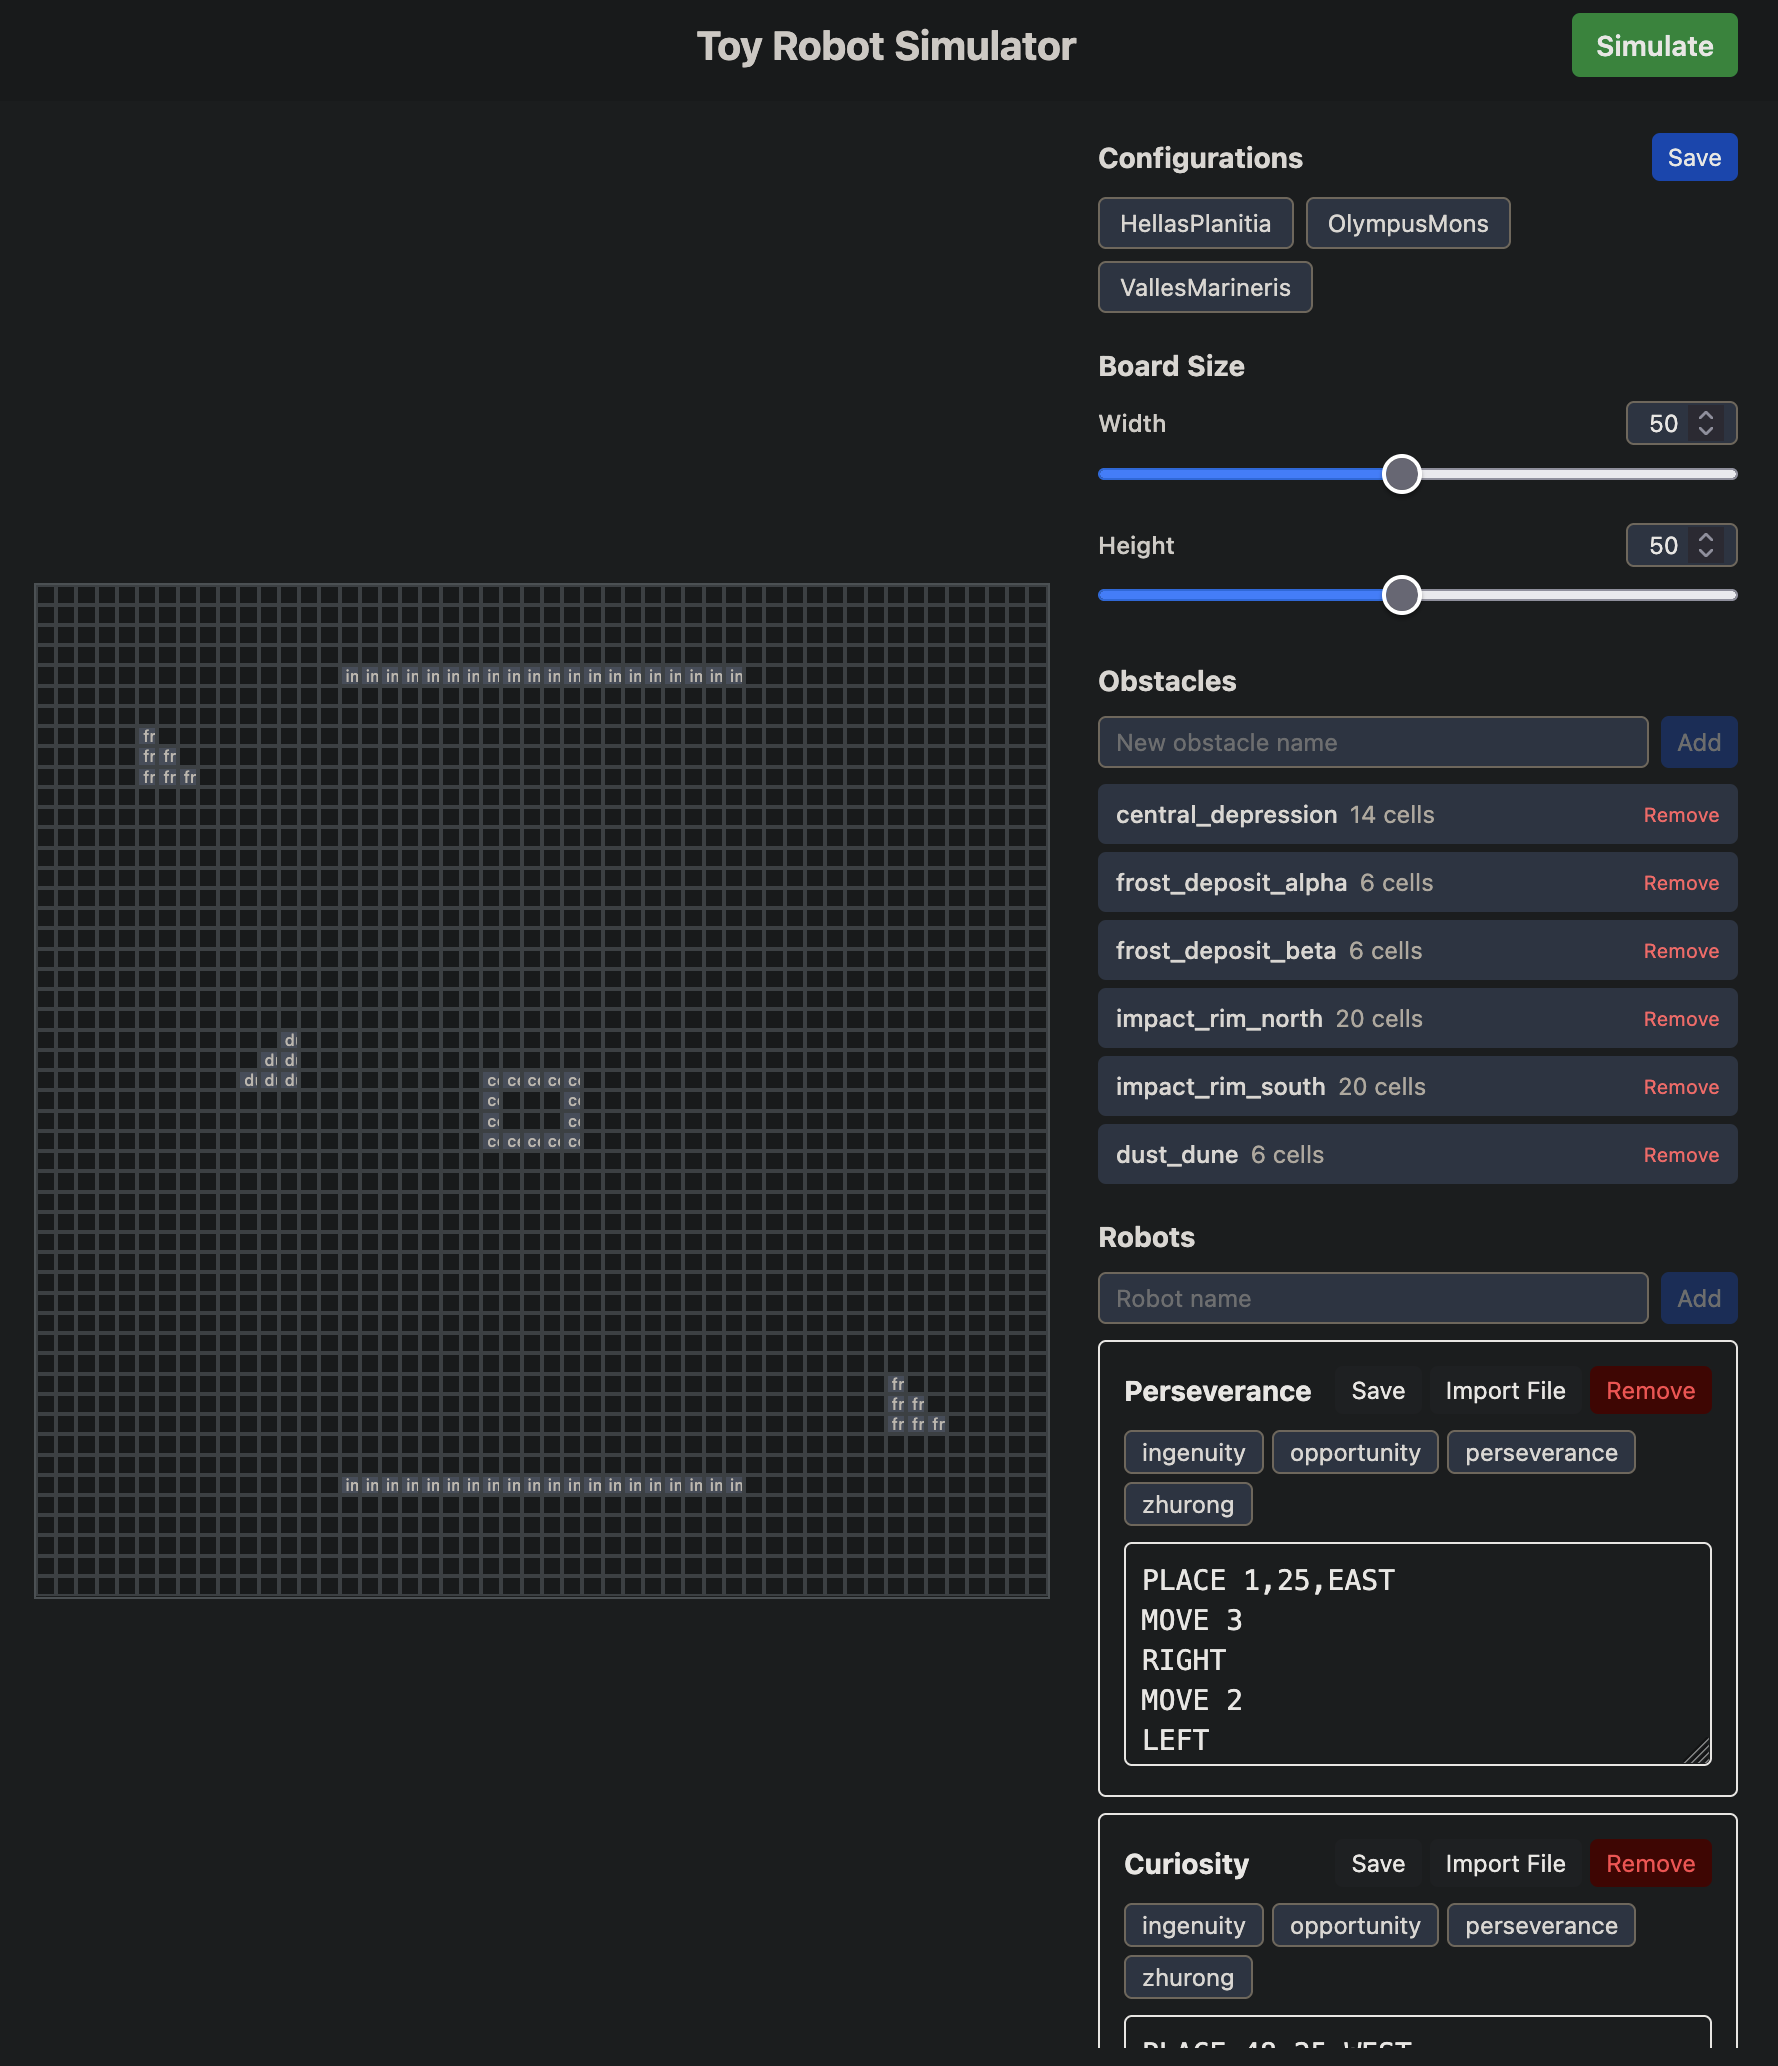
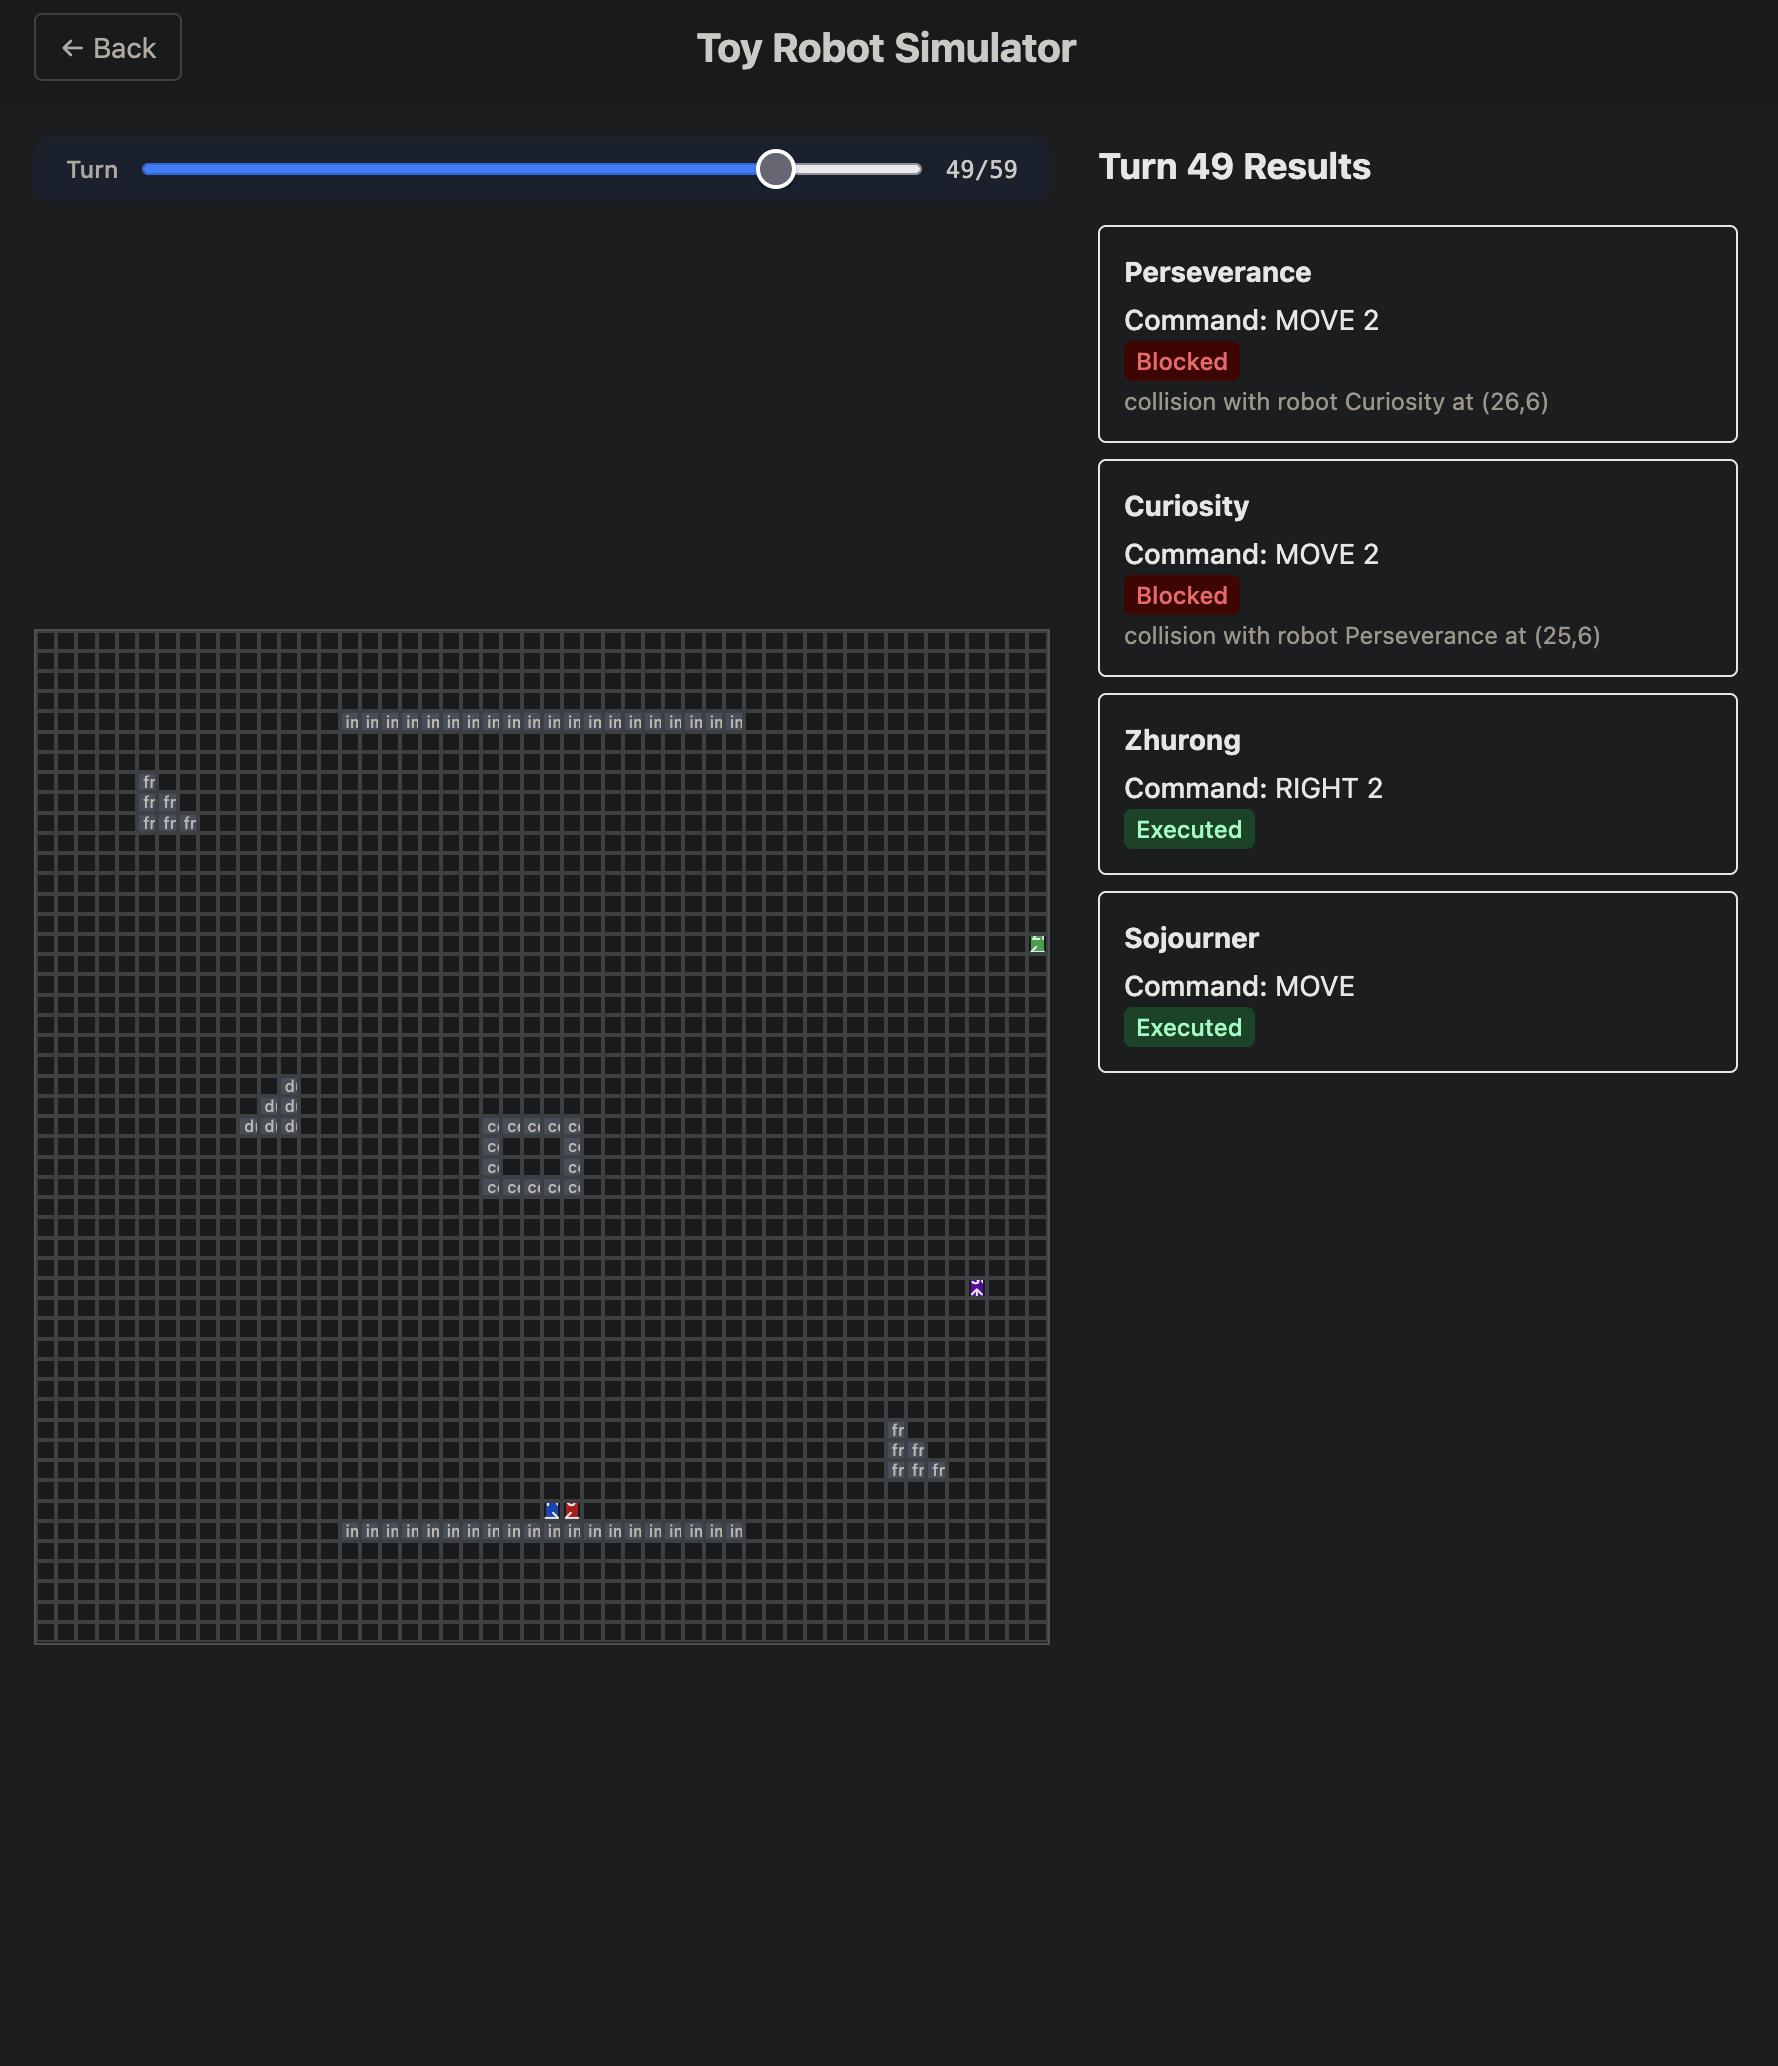
Toy Robot Simulator
A simulation web-app of multiple toy robots moving on a configurable table top.
Images
Stack
- Python core (
/core): pure logic, no I/O, no framework dependencies - Pytest (
/tests): unit tests against core data models - FastAPI (
/api): stateless REST API wrapping the core - TypeScript + React + Vite + Tailwind (
/ui): prototype UI
Quick Start
make install
make server
The API runs at http://localhost:8000.
make client
The UI runs at http://localhost:5173.
There is also a VSCode compound launch config Launch TableTopBots in launch.json which launches both of these.
Tests
make test
API Endpoints
| Method | Path | Description |
|---|---|---|
| POST | /simulate | Run full simulation, return snapshots |
| POST | /validate | Validate a single command string |
| POST | /parse-file | Parse a .txt command file |
A website for my girlfriend to demand princess treatment now. By popular (her) demand.
princesstreatment.now
Static SPA for composing a shareable artifact: an image or video, optional audio overlay, optional top/bottom text. All state lives in the URL — no backend, no database, no accounts. Paste a link, get a fullscreen view.
Deployed as a single static bundle on Cloudflare Pages.
Stack
- React 19 + TypeScript + Vite
- Tailwind CSS v4 (CSS-first config via
@themein src/index.css) - react-router-dom v7 (
createBrowserRouter) - FontAwesome (free-solid-svg-icons)
- Playwright (chromium) for E2E tests
- ESLint 9 + Prettier 3
Routes
| Path | Page | Purpose |
|---|---|---|
/ | CreatorPage | Composer with live preview and inputs |
/view | ViewPage | Fullscreen artifact view (no inputs, no chrome) |
Navigation between the two preserves the full query string verbatim. The Reset button on / clears state in place — pathname stays /.
URL params
| Param | Values | Notes |
|---|---|---|
src | URL | Image, direct video, or YouTube URL |
audio | URL | Optional audio track played over the media |
top | string | Optional overlay text, top-aligned |
bottom | string | Optional overlay text, bottom-aligned |
Standard URLSearchParams encoding. YouTube URLs (youtube.com/watch?v=, youtu.be/, youtube.com/shorts/, youtube.com/embed/) are detected and rendered via the privacy-friendly youtube-nocookie.com embed.
Example links
/?src=https%3A%2F%2Fexample.com%2Fpic.png&top=hello&bottom=world
/?&src=https%3A%2F%2Fyoutu.be%2FdQw4w9WgXcQ&audio=https%3A%2F%2Fexample.com%2Ftrack.mp3
/view&src=https%3A%2F%2Fexample.com%2Fpic.png
Development
npm install
npm run dev          # Vite dev server on :5173
Scripts
| Command | Purpose |
|---|---|
npm run dev | Dev server on the default Vite port |
npm run dev:e2e | Dev server on :5273 (used by Playwright) |
npm run build | Typecheck + production build to dist/ |
npm run preview | Serve the built bundle locally |
npm run typecheck | tsc -b only, no emit |
npm run lint | ESLint over src/ and tests/ |
npm run lint:fix | ESLint with --fix |
npm run fmt | Prettier check (used in CI) |
npm run fmt:fix | Prettier write across the repo |
npm run e2e | Run Playwright E2E tests |
npm run e2e:ui | Playwright UI mode |
npm run e2e:install | Install dependencies for UI tests |
VSCode
Workspace settings in .vscode/settings.json enable format-on-save with Prettier and eslint --fix on save. Recommended extensions are pinned in .vscode/extensions.json.
Testing
Playwright tests live in tests/ and use shared testids from tests/helpers/testids.ts. The Playwright config spawns its own dev server on :5273 (dev:e2e) so it never collides with a running npm run dev on :5173.
Test fixtures (1-frame pink image, 1-second silent video, 1-second silent audio) live in public/test-fixtures/ and are generated with ffmpeg. They are committed so tests run deterministically.
npm run e2e                   # all specs, headless
npm run e2e:ui                # interactive UI
Playwright spec coverage:
- creator.spec.ts — composer URL state, mode toggle, reset, share-enable rules
- preview.spec.ts — image / direct video / YouTube rendering, the
mutedattribute gotcha, overlays, maximize - playback.spec.ts — image+audio and video+audio playback sync
- view.spec.ts — fullscreen view, minimize, round-trip
- theme.spec.ts — system preference + toggle persistence
- share.spec.ts — clipboard fallback when
navigator.shareis unavailable
Build & deploy
npm run build
CI (.github/workflows/ci.yml) runs typecheck, lint-check, format-check, build, and Playwright tests on every push and PR to main.
Architecture notes
- All state is in the URL. useRequestState wraps
useSearchParamsand is the single source of truth — no React state shadows the URL. - YouTube integration is
postMessage-only. The app does not loadhttps://www.youtube.com/iframe_apior touchwindow.YT. See src/utils/youtube.ts and theinfoDeliverylistener in src/components/Preview.tsx. - Theme FOUC is prevented by an inline script in index.html that sets
class="dark"on<html>before any stylesheet loads. - The
<video>element omits themutedattribute entirely when there's no custom audio track (rather thanmuted={false}). Browsers treatmutedas a boolean attribute whose mere presence mutes the element regardless of value, somuted={false}would mute and prevent native audio playback. This is enforced by tests/preview.spec.ts.
CryptIt - File Encryption with Shamir Secret Sharing
A secure, cross-platform file encryption application built with Tauri, Vue 3, and Rust. CryptIt uses AES-256-GCM encryption combined with Shamir Secret Sharing to provide enterprise-grade security for your sensitive files.
🔐 Features
Core Functionality
- File Encryption/Decryption: Secure AES-256-GCM encryption for any file type
- Shamir Secret Sharing: Split encryption keys into k-of-n shares for enhanced security
- Cross-Platform: Native desktop app for Windows, macOS, and Linux
- Simple UI: Intuitive interface for selecting files, configuring shares, and managing encryption
Security Features
- AES-256-GCM: Industry-standard encryption with authenticated encryption
- Memory Safety: Rust-powered backend with automatic memory cleanup
- No Key Persistence: Keys are never stored permanently
- Secure Random Generation: Cryptographically secure random number generation
- Custom File Format: Secure
.cryptitfile format with integrity protection
🏗️ Architecture & Design Decisions
Technology Stack
- Frontend: Vue 3 + TypeScript + Vite for reactive UI
- Backend: Rust + Tauri for native performance and security
- Crypto:
aes-gcmcrate for encryption,shamirscrate for secret sharing - UI: Native file dialogs via
tauri-plugin-dialog
Design Decisions
- Single Algorithm Focus: Started with AES-256-GCM for MVP simplicity
- Modular Architecture: Easy to extend with additional algorithms
- Secure by Default: Tauri v2 permissions model for maximum security
- Simple File Format: Custom
.cryptitformat with nonce and ciphertext - Memory-Safe Operations: Automatic cleanup of sensitive data
🎯 MVP Constraints
This MVP was designed to be functional within ~1 hour of development time:
What's Included
- ✅ Single encryption algorithm (AES-256-GCM)
- ✅ Shamir Secret Sharing with configurable k-of-n thresholds
- ✅ File and directory selection dialogs
- ✅ Basic encrypt/decrypt workflow
- ✅ Share generation and input handling
- ✅ Cross-platform compatibility
What's Not Included (Yet)
- ❌ Multiple encryption algorithms
- ❌ Batch file processing
- ❌ Share export to files/QR codes
- ❌ Progress bars for large files
- ❌ File metadata preservation
- ❌ Settings/preferences
- ❌ Advanced error handling UI
🚀 Future Extensions
Planned Features
- Multiple Algorithms: ChaCha20-Poly1305, AES-256-CTR support
- Advanced Share Management:
- Export shares to separate files
- QR code generation for shares
- Share validation and testing
- Enhanced UI/UX:
- Progress indicators for large files
- Drag & drop file selection
- Dark/light theme toggle
- Batch file processing
- Security Enhancements:
- Hardware security module (HSM) integration
- Key derivation from passwords
- File integrity verification
- Enterprise Features:
- Audit logging
- Policy management
- Centralized share storage
Potential Integrations
- Cloud Storage: Secure cloud backup of encrypted files
- Password Managers: Integration with 1Password, Bitwarden
- Hardware Tokens: YubiKey support for additional authentication
- Mobile Apps: React Native companion for share management
🛠️ Development
Prerequisites
- Node.js 18+ and npm
- Rust 1.70+
- System Dependencies:
- macOS: Xcode Command Line Tools
- Linux:
build-essential,libwebkit2gtk-4.0-dev,libssl-dev - Windows: Microsoft Visual Studio C++ Build Tools
Setup
# Clone the repository
git clone <repository-url>
cd CryptIt

# Install dependencies
npm install

# Run development server
npm run tauri dev
Development Commands
# Start development server with hot reload
npm run tauri dev

# Run Rust tests
cd src-tauri && cargo test

# Run frontend linting
npm run lint

# Type checking
npm run type-check

# Build for development (faster, larger)
npm run tauri build -- --debug
📦 Building & Distribution
Production Build
# Build optimized production version
npm run tauri build

# Build with specific target
npm run tauri build -- --target x86_64-pc-windows-msvc

# Build for all platforms (requires setup)
npm run tauri build -- --target universal-apple-darwin
Platform-Specific Builds
# macOS Universal Binary (Intel + Apple Silicon)
npm run tauri build -- --target universal-apple-darwin

# Windows (x64)
npm run tauri build -- --target x86_64-pc-windows-msvc

# Linux (x64)
npm run tauri build -- --target x86_64-unknown-linux-gnu
Output Locations
- macOS:
src-tauri/target/release/bundle/macos/ - Windows:
src-tauri/target/release/bundle/msi/ - Linux:
src-tauri/target/release/bundle/deb/orappimage/
🧪 Testing
Automated Testing
# Run all Rust unit tests
cd src-tauri && cargo test

# Run with verbose output
cd src-tauri && cargo test -- --nocapture

# Test specific module
cd src-tauri && cargo test crypto::tests
Manual Testing Checklist
- File encryption with various file types and sizes
- Share generation with different k-of-n configurations
- Decryption with minimum required shares
- Error handling for insufficient shares
- Cross-platform file dialog functionality
- Memory usage with large files
📁 Project Structure
CryptIt/
├── src/                          # Vue frontend
│   ├── App.vue                   # Main application component
│   ├── main.ts                   # Application entry point
│   └── assets/                   # Static assets
├── src-tauri/                    # Rust backend
│   ├── src/
│   │   ├── lib.rs               # Main Tauri application
│   │   ├── crypto.rs            # AES encryption module
│   │   ├── sss.rs              # Shamir Secret Sharing
│   │   └── main.rs              # Application entry point
│   ├── capabilities/
│   │   └── default.json         # Tauri permissions
│   ├── Cargo.toml               # Rust dependencies
│   └── tauri.conf.json          # Tauri configuration
├── .vscode/                      # VSCode configuration
│   ├── launch.json              # Debug configurations
│   ├── settings.json            # Workspace settings
│   └── extensions.json          # Recommended extensions
├── package.json                  # Node.js dependencies
└── README.md                     # This file
🔧 Debugging
Frontend Debugging
# Open browser dev tools in the app
# Right-click → "Inspect Element" or press F12

# Check console for JavaScript errors
# Network tab for Tauri command failures
Backend Debugging
# Run with debug logging
RUST_LOG=debug npm run tauri dev

# Run with application-specific logs
RUST_LOG=cryptit=debug npm run tauri dev

# Enable backtraces for panics
RUST_BACKTRACE=1 npm run tauri dev
VSCode Debugging
- Install recommended extensions (see
.vscode/extensions.json) - Use provided debug configurations in
.vscode/launch.json - Set breakpoints in both Rust and TypeScript code
- Run "Tauri Development Debug" configuration
🔒 Security Considerations
Implemented Security Measures
- Memory Safety: Automatic cleanup of encryption keys
- Secure Random Generation: CSPRNG for all cryptographic operations
- Constant-Time Operations: Resistant to timing attacks
- No Key Storage: Keys exist only in memory during operations
- Tauri Security Model: Granular permissions for system access
Security Best Practices
- Always verify share authenticity before decryption
- Store shares in separate, secure locations
- Use strong physical security for share storage
- Regularly test decryption process with backup shares
- Keep the application updated for security patches
📄 License
This project is licensed under the MIT License - see the LICENSE file for details.
🤝 Contributing
Contributions are welcome! Please read our contributing guidelines and submit pull requests for any improvements.
Development Workflow
- Fork the repository
- Create a feature branch (
git checkout -b feature/amazing-feature) - Make your changes
- Run tests (
cargo testand manual testing) - Commit your changes (
git commit -m 'Add amazing feature') - Push to the branch (
git push origin feature/amazing-feature) - Open a Pull Request
Built with ❤️ using Rust, Vue, and Tauri
TrayRunner
TrayRunner is a macOS menu bar application that allows you to quickly access and run scripts from your computer. The app sits in your menu bar and provides a fast, keyboard-accessible way to search and execute scripts.
Features
- Global Keyboard Shortcut: Quickly open the script search HUD with ⌘+Shift+Space
- Script Directory Monitoring: Add script folders that automatically update when changes are detected
- TODO: Fuzzy Search: Type to quickly find and run the script you need
- Support for Multiple Script Types: Works with shell (.sh), Python (.py), Ruby (.rb), Perl (.pl), and PHP (.php) scripts // I only tested with .sh so far, might change in the future.
Requirements
- macOS 15.0 or later // might work with older, I used 15, I don't plan on supporting older
- Xcode 16.0 or later // might work with older, I used 16 tho
Installation
Option 1: Download the Release
- Go to the Releases page
- Download the latest version of TrayRunner.app.zip
- Extract the ZIP file
- Move TrayRunner.app to your Applications folder
- Launch the app
Build from Source
Just clone the project and Cmd + R in XCode
Usage
- After launching TrayRunner, you'll see a terminal icon in your menu bar
- Click on the menu bar icon to open the menu and access settings
- Press ⌘+Shift+Space to open the script search overlay
- Add script folders by opening Settings → Watched Folders
- Start typing to search for scripts, then press Enter to run the selected script
Development
Prerequisites
- Xcode 13.0 or later
- Swift 5.5 or later
Project Structure
TrayRunner/- Main source code directoryData/- Data models and script managementUI/- User interface componentsComponents/- Reusable UI componentsSettings/- Settings interfaceSearch/- Script search functionality
Assets.xcassets/- App assets and icons
Dependencies
- KeyboardShortcuts - For global keyboard shortcut handling
Contributing
Contributions are welcome! If you'd like to contribute:
- Fork repo
- Make PR
License
This project is licensed under the MIT License - see the LICENSE file for details.
Python 3 Tk based Desktop GUI App template
What is this?
In terms of an MVC design pattern, The framework includes the skeleton for the "model" and state permanence as well as supporting data structures for this. It also includes wrappers to simplify the creation of the UI, or the "view", and has common control flows implemented (page navigation) It also includes the logical structure and file structure to support the implementation of the underlying controller code in /lib/app
Origins
This was forked from a Python software engineering group coursework I made in my Engineering Foundation Year. 99% of the code is mine as I was the only one who could actually code amongst the engineers. The source code for the rotational-dynamics-python coursework can be found here.
Seeing Potential
I saw the potential in repurposing the GUI elements and codebase for the coursework into a template/framework that I could use in the future. I eventually want to make it such that I can quickly implement backend functionality separately to the front-end in a way that is similar to and will be simple to port over to a web-app type deployment with flask.
Documentation
Directory Structure
main.py : program entry point
README.md : you are here
/lib : library for everything.
lib/app : your core back-end app code goes here (I suggest using static atomic functions that can be called from the rest of the code)
lib/components : you core front-end app code goes here. Each "Page" of the app has its own class file here. Object instance is used and passed around (Singleton design pattern).
/lib/resources/config : configuration JSONs go here (you can encourage end user editing of these files, but I suggest using the a preference page for this, so that you can sanitize user configurations. )
/lib/resources/images: program image resources go here
/lib/core : contains functions responsible for handling core desktop-app-template functionality (preferences, theming etc. )
/lib/ui : contains all UI elements that can be used (import UI elements from here)
/lib/ui/tk-utils : contains helper functions that simplify repetitive tk actions.
/lib/ui/tk-widgets : contains the Class files for the App versions of the tkinter base widgets
/lib/ui/compound-widgets : contains the Class files for custom compound widgets made from tk-widgets.
/lib/ui/app-widgets : here is where you would put your own custom widgets for your app, if you need them
imports best practices to prevent circular dependencies
- only import as needed, avoid wildcard imports where possible
- nothing should be imported into /lib/core
- import ui components straight from /lib/ui. Internal import routing should be handled by /lib/ui/init.py
How to use (developer)
- Use the included DemoPage.py and TemplatePage.py as a start point for creating the UI using the App's built in widgets
- To contribute new AppWidgets, use the App
convention to prevent conflicts with Tk's default widgets. also try to use polymorphic inheritance from the original Tk widgets. - To contribute new components, use the
Page convention - To contribute new functions, use generate_
and/or common sense :P
How to use (end-user)
- The preferences page should have useful options such as setting the resolution of the program window, and enabling certain settings.
Features to be added
- DemoPage with most of the widgets implemented for demo purposes.
- For some reason the program_restart function only works once, I'm assuming it's some kinda pid issue. Long term solution might be to remove the need for having to restart the program at all.
Desktop translation/conversion app with Google Translate API integration, built with DesktopAppTemplate
Python text converter app
The app was initally meant as a desktop app that would convert strings based on programmed rulesets (eg. randomcase). I think it's currently programmed with UwU-case.
google translate API integration
I then linked the app with google translate's API to get it to speak. I deeply regret this decision.
DEVELOPMENT STATUS
The app was made using an outdated version of DesktopAppTemplate. Which means this thing probably still runs on Python 2.7, and the libraries I used and the API has probably stopped working. I might revisit this at some point to bring it back to life.
Flutter GUI for the Windows robocopy command, built to simplify local NAS backup automation
Flutter RoboCopy
A flutter project to create a GUI for the windows RoboCopy command.
Done to learn flutter but also to eventually automate/simplify my local network SAMBA NAS backup.
MVP works, but was abandoned as there wasn't a need for it because I changed my NAS setup.
PythonTrayShortcuts
Create your own custom tray launchpad with python scripts
Setup (user)
- install python 3.13 or later
pip install -r requirements.txtpython3 main.py- you can then add the above command to launch on boot etc.
Testing
- test suffix "_test"
unittestpython builtin testing library
TODO:
proper testing integration with visual studio code
auto format code on save in vs code
code completions/intellsense in vs code
load UI configuration from json file {"items", ["key1", "SEPERATOR", "key2"]}
subprocess execution (execute .py file from runner) and drag n drop scripts into
/scriptslaunch on boot support (Windows, MacOS, Linux?). Potentially can make this work as an intrinsic script that does OS detection and executes commands
custom logo.png support (should be possible, default to defaultLogo.png in hidden folder)
support for launch with admin rights (Windows), elevated (sudo) permissions in Linux and potentially bypassing some MacOS limitations (might need to deal with some stupid Apple Mac API shit)
determine async behavior, do we FIFO?
opl-py
A typed Python SDK for working with OpenPowerlifting data.
Query lifters, meets, and rankings from a local DuckDB database built from the official OpenPowerlifting bulk CSV.
Includes optional ML-based trajectory prediction analytics module.
0a. PyPI Installation (for usage)
To install opl-py from PyPI for usage:
pip install opl-py
For optional analytics features (trajectory prediction, percentile rankings):
pip install opl-py[analytics]
0b. Local/Editable installation (for development):
To install opl-py as an editable package, not from PyPI, use:
make install
or directly with pip:
pip install -e ".[dev,analytics]"
1. Quick Start
Download and ingest the full OPL dataset (~250 MB) into a local DuckDB file: DuckDB path is {platform_dirs.user_data_dir}/opl-py/opl.duckdb
opl init
Update the database
opl update
Then query it with the opl Python sdk.
import opl

client = opl.OPL()

# Look up a lifter
lifter = client.lifter("Ray Williams #1")
print(lifter.best_total_kg)
print(lifter.competition_count)

for entry in lifter.history():
    print(f"{entry.date}: {entry.total_kg}kg @ {entry.bodyweight_kg}kg")

# Query rankings
top_raw = client.rankings(
    sex=opl.Sex.MALE,
    equipment=opl.Equipment.RAW,
    event=opl.Event.SBD,
    weight_class="93",
    order_by="dots",
    limit=10,
)

# Raw SQL for custom queries
results = client.query(
    "SELECT Federation, COUNT(*) as n FROM entries GROUP BY Federation ORDER BY n DESC LIMIT 10"
)
Web App Development (with HMR)
To run the API and UI locally with hot-reload:
make dev
This starts both servers in parallel:
- API — uvicorn on
http://localhost:8000with--reload(restarts on Python file changes) - UI — Vite dev server on
http://localhost:5173with HMR (React fast refresh)
Additional Documentation
| Guide | Description |
|---|---|
| SDK | Python client, models, and enums |
| Analytics | Percentile rankings, feature extraction, trajectory prediction |
| Docker | Docker setup for the web app ui |
Attribution
This project uses data from the OpenPowerlifting project. OpenPowerlifting data is contribueted to the public domain.
prompt-as-endpoint
Helper library for creating API endpoints that use LLMs to return schema-validated JSON responses.
Quick Start
This requires Ollama to be running, the default model is llama3.1:8b but this can be changed in demo/src/server.ts.
npm install
npm run demo:dev
This starts the demo Hono server that talks to Ollama on the default port, then you can run one of the demo functions.
npm run demo greet
demo/src/demo.ts makes a call to the Hono server, making a call to Ollama, returning a typed response.
Packages
prompt-as-endpoint- Main librarydemo- Demo Client <-> Hono Server <-> Ollama
License
MIT
pwordgen
A tiny, TypeScript-native password generator for browser and Node.js environments.
Installation
npm install pwordgen
Quick Start
import { generatePassword, estimateEntropyBits } from 'pwordgen';

// Generate a password with defaults (16 chars, all character classes)
const password = generatePassword();

// Estimate entropy
const entropy = estimateEntropyBits({ length: 16 });
console.log(`Entropy: ${entropy.toFixed(1)} bits`);
API
generatePassword(options?): string
Generates a cryptographically secure password.
interface PasswordOptions {
  length: number; // Default: 16
  lowercase: boolean; // Default: true
  uppercase: boolean; // Default: true
  digits: boolean; // Default: true
  symbols: boolean; // Default: true
  custom: string; // Default: ''
  excludeSimilar: boolean; // Default: false (excludes il1Lo0O)
  exclude: string; // Default: ''
  requireEachSelectedClass: boolean; // Default: false
}
Examples
// Custom length
generatePassword({ length: 12 });

// Letters only
generatePassword({ digits: false, symbols: false });

// Exclude similar characters
generatePassword({ excludeSimilar: true });

// Custom character set
generatePassword({
  lowercase: false,
  uppercase: false,
  digits: false,
  symbols: false,
  custom: 'ABCDEF0123456789',
});

// Ensure at least one from each selected class
generatePassword({
  length: 12,
  requireEachSelectedClass: true,
});
estimateEntropyBits(options?): number
Calculates estimated entropy in bits for the given configuration.
const entropy = estimateEntropyBits({
  length: 12,
  digits: false,
  symbols: false,
});
Character Classes
import { CHARACTER_CLASSES } from 'pwordgen';

CHARACTER_CLASSES.lowercase; // "abcdefghijklmnopqrstuvwxyz"
CHARACTER_CLASSES.uppercase; // "ABCDEFGHIJKLMNOPQRSTUVWXYZ"
CHARACTER_CLASSES.digits; // "0123456789"
CHARACTER_CLASSES.symbols; // "!@#$%^&*()_+-=[]{}|;:,.<>?"
CHARACTER_CLASSES.similar; // "il1Lo0O"
Security
- Uses Web Crypto API (browser) and Node.js crypto module
- Rejection sampling ensures uniform distribution
- No network calls or telemetry
- Cryptographically secure random number generation
Browser Support
Chrome 37+, Firefox 34+, Safari 7.1+, Edge 12+
Node.js Support
Node.js 16+
Development
npm install          # Install dependencies
npm test             # Run tests
npm run build        # Build package
npm run lint         # Lint code
npm run prettier:fix # Format code
License
MIT
Proof-of-concept robotics platform using sensor data to augment visual navigation systems for autonomously navigating robots.
ThymPi - Final Year Dissertation Research Project
"An Intelligent Approach to Navigating Environments With Compliant Obstacles"
A research project to develop a proof-of-concept system for using sensor data to augment visual navigation systems used by autonomous robots.
A visual navigation system can classify objects but it has no context on the properties of an object, this project proves that you can use sensor data to drive intelligent decision-making such that a truly optimal path can be used.
The final hardware platform was a Raspberry Pi 3 connected to a Pi Camera running OpenCV and MPU6050 IMU, controlling a Thymio using asebamedulla.
It was able to idenfify the obstacles in its surroundings and test object compliance using IMU readings, using it to determine the truly optimal paths, accounting for obstacle compliance.
Setup Guide:
This setup guide isn't step by step but instead a rough guide to help you get started as a lot of the installation process is highly dependent on the platform you intend to run this on.
For reference, this is the development environment I used
Computer: Raspberry Pi 3B+
Operating System: Raspberry Pi OS (legacy)
note: this is the debian 10 (buster) based version
MPU6050 Setup
The installation process for this is very simple, simply follow the instructions in the repository
Repository: https://github.com/m-rtijn/mpu6050
Pi Camera Setup
In order to setup and enable the Pi Camera interface, follow the instructions at the link below
Pi Camera Documentation: https://picamera.readthedocs.io/en/release-1.13/install.html
Thymio Interface Setup
The installation process for this is very well explained in the repository below
GitHub repository: https://github.com/lebalz/thympi
OpenCV Setup
The OpenCV install process is very complicated and I suggest you look up the installation process for your own system.
However, the following article and forum is a good place to get started
Core Electronics: https://core-electronics.com.au/guides/object-identify-raspberry-pi/
A Haskell interpreter for STQL, an SQL-inspired language designed for Turtle RDF file manipulation
PLC
Programming Language Concepts Coursework
How to run
ghc Stql.hs./Stql prN.stql- wait patiently
Disclaimer
If something went wrong and you've run cabal install... multiple times, you should delete the dist-newstyle folder and the .ghc.environment... files that showed up as a result cause they, most likely, will be incorrect, and run the command again, once.
Software Engineering Group Project - Runway Reclaration
A Java + JavaFX desktop app using MVC principles and AGILE software development practices.

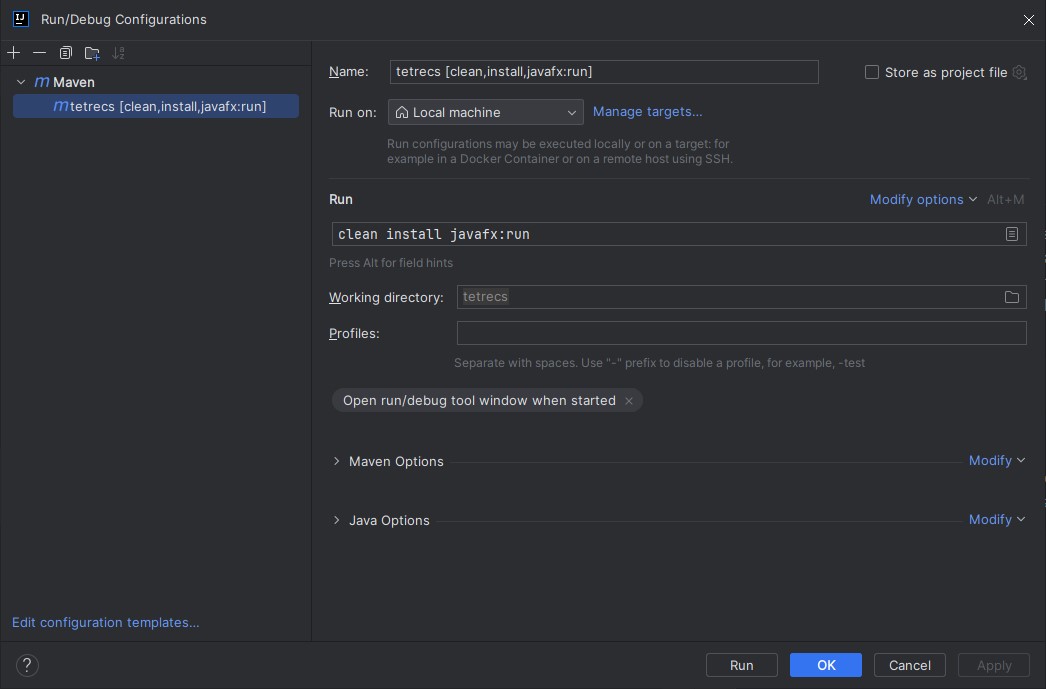
TetrECS
Tetris game project for Programming 2 (1st year) coursework
Compile and Run
Technically this can be run using just maven cli and javafx cli. But the easiest way is to compile and run is to open the project with intellij IDEA (IDE used for this project) and create a run configuration that does maven clean install and ``javafx:run` for you.
Issues
The game was meant to connect to a server on the University of Southampton's internal network, which requires you to use the University's VPN to connect to. So when you try to launch the game, it will throw errors trying to connect and enable the multiplayer functionality. I might fork this repository and make a single player version of this game if I feel like it at some point but in theory, bypassing the multiplayer connection code should work.
Rotational Dynamics Py
This was a group coursework from my Engineering Foundation Year at University of Southampton's Malaysia Campus. It was a software engineering group project where the goal was to create a python app using tkinter as an educational aide to a certain mechanics topic.
We chose to create a rotational dyamics (angular momentum and inertia) calculator and visualizer. I was the only one with any real programming experience, so 99% of the code here is mine, albeit a much younger and less skilled version of myself.
However, despite my lack of experience at the time, I saw the potential of repurposing the bulk of the GUI code for this app into a desktop app template that I can use in the future for rapic prototyping. This app was made in python2, which was already deprecated at the time, because of an outdated coursework spec. And I haven't felt the need to update it. If you want to run it, use python 2.7 and tkinter. It should work, though you might also have to fix some minor bugs before it runs, entropy is real.
Desktop App Template
The core desktop app functionality in this project was then turned into DesktopAppTemplate. Which has python 3 support and will be carried over into the future :)
How to get this ancient thing to work :p
Tested on a Ubuntu 22 VM because I didn't want to have to install python 2 onto any of my physical machines.
As always, start with.sudo apt-get update -y; sudo apt-get upgrade
install python 2
sudo apt-get install python2
install python-tk (for python2)
sudo apt-get install python-tk
install pip for python 2
wget https://bootstrap.pypa.io/pip/2.7/get-pip.py python2 get-pip.py
use pip to install pillow
python2 -m pip install Pillow
CyberVehiclesOverhaul fork supporting Phantom Liberty Vehicles & version 2.1
An extension to the Cyber Vehicles Overhaul mod by Erok
This was initially made when the original mod didn't support Phantom Liberty and 2.1 vehicles, as well as to experiment with game modding further. Has since been abandoned as the mod now natively supports these vehicles
Accurate Speedometer
Using Accurate Speedometer mod is recommended so that the tuned speeds are more realistic. Although NPCs will still drive at "40mph" (or an adjusted realistic ~25mph).
Notes
Cyber Engine Tweaks vehicle system documentation \
List of vehicles in Cyberpunk Wiki
Existing vehicles with new variants:
for these, the existing tweak files can be modified to account for the new variations
Arch Nazare (Vehicle.v_sportbike2_arch_player)
Arch Nazare Racer (Vehicle.v_sportbike2_arch_player_02?)
Arch Nazare Kobold (Vehicle.v_sportbike2_arch_player_03?)
Arch Nazare Itsumade (Vehicle.v_sportbike2_arch_tyger_player?)
Jackie's Arch (Vehicle.v_sportbike2_arch_jackie_player, Vehicle.v_sportbike2_arch_jackie_tuned_player)
Malina-mobile (Vehicle.v_sportbike2_arch_linas_player?)

Yaiba Kusanagi CT-3X (Vehicle.v_sportbike1_yaiba_kusanagi_player?)
Yaiba Kusanagi Akashita (Vehicle.v_sportbike1_yaiba_kusanagi_player_02?)
Yaiba Kusanagi Peacekeeper (Vehicle.v_sportbike1_yaiba_kusanagi_player_03?)
UNKNOWN? (Vehicle.v_sportbike1_yaiba_kusanagi__tyger_player?)

Archer Quartz Bandit (Vehicle.v_standard2_archer_quartz_nomad_player?)
Archer Quartz Specter (Vehicle.v_standard2_archer_quartz_nomad_player_02?)

Brennan Apollo (Vehicle.v_sportbike3_brennan_apollo_player)
Brennan Apollo 650-S (Vehicle.v_sportbike3_brennan_apollo_player_02??)

Herrera Outlaw GTS (Vehicle.v_sport1_herrera_outlaw_player) [DONE]
Herrera Outlaw Weiler (Vehicle.v_sport1_herrera_outlaw_heist_player) [DONE]

Mahir Supron FS3 (Vehicle.v_standard3_mahir_supron_player)
Mahir Supron Trailbruiser (Vehicle.v_standard3_mahir_supron_kurtz_player)

Mizutani Shion (Vehicle.v_sport2_mizutani_shion_player) [DONE]
Mizutani Shion Coyote (Vehicle.v_sport2_mizutani_shion_nomad_player?) [DONE?]
Mizutani Shion Samum (Vehicle.v_sport2_mizutani_shion_nomad_02_player??)

Porshe 911 Turbo (Vehicle.v_sport2_porsche_911turbo_player)
Porshe 911 Turbo Cabriolet (Vehicle.v_sport2_porsche_911turbo_cabrio_player)

Quadra Type-66
Quadra Type-66 Wingate
Quadra Type-66 Hoon

// Type66's should be one of these
(Vehicle.v_sport2_quadra_type66_player)
(Vehicle.v_sport2_quadra_type66_02_player)
(Vehicle.v_sport2_quadra_type66_ncu_player)
(Vehicle.v_sport2_quadra_type66_nomad_player)
(Vehicle.v_sport2_quadra_type66_nomad_player_03)
(Vehicle.v_sport2_quadra_type66_avenger_player)

Thorton Colby
Thorton Colby Barghest
Thorton Colby Vulture

Thorton Galena
Thorton Galena Locust
Entirely new vehicles:
for these, new tweak files will need to be created from TweakDB data
Herrera Riptide GT2 (Vehicle.v_sport1_herrera_riptide_player?)
Herrera Riptide Terrier (Vehicle.v_sport1_herrera_riptide_terrier?)

Makigai Tanishi T400 (Vehicle.v_standard3_makigai_tanishi_player? mrhands?)
Makigai Tanishi Kuma (Vehicle.v_standard3_makigai_tanishi_kuma?)

Militech Hellhound (Vehicle.v_standard3_militech_hellhound_player)

Mizutani Hozuki MH2
Mizutani Hozuki Hoseki (Vehicle.v_standard2_mizutani_hozuki_player)

Quadra Sport R-7
Quadra Sport R-7 Charon
Quadra Sport R-7 Sterling
Quadra Sport R-7 Chiaroscuro
Quadra Sport R-7 Vigilante

// Sport R-7's should be one of these
(Vehicle.v_sport1_quadra_sport_r7_mrhands)
(Vehicle.v_sport1_quadra_sport_r7_netrunner)
(Vehicle.v_sport1_quadra_sport_r7_netrunner_01)
(Vehicle.v_sport1_quadra_sport_r7_netrunner_02)
(Vehicle.v_sport1_quadra_sport_r7_player)
(Vehicle.v_sport1_quadra_sport_r7_player_02)

Thorton Merrimac
Thorton Merrimac Warlock
Changelog
- Sped up the Herrera Outlaw, made the Weiler variation actually a tuned up version